data masking
|
PROFILE PERMISSIONS REQUIRED |
|
Manage Data Templates, Perform Data Copy |
What is data masking?
Data masking is the process of replacing sensitive information with fully functional, dummy data when data is copied from a production environment to a non-production environment.
Why is data masking important?
Data masking is necessary in situations where you need to share sensitive data from a production environment with non-production users, such as application developers. Production environments contain valuable and sensitive data, like phone numbers and credit card details, and require protection.
Copying sensitive data into a development environment without data masking increases the likelihood that the data is used inappropriately. Data masking ensures that the original sensitive data cannot be retrieved or accessed outside of the product environment. However, data masking still ensures that the records that are modified are fully functional in a development and test environment.
Security and Regulatory Compliance
Security
With OrgTools, data only travels between your network and Salesforce. Data and credentials never pass through any third-party servers.
Regulatory Compliance
Masking data is best business practice in order to minimize the risk of data leaks and is also required by law. OrgTools can help organizations comply with the following regulatory requirements.
U.S. Health Insurance Portability and Accountability Act (HIPAA)
HIPAA protects the privacy and security of protected health information (PHI) of patients. PHI-related data that is stored in databases or transmitted over a network needs to have complete data protection. The requirements for data protection as they relate to data masking are the following:
- Standard: Access Control. Implement technical policies and procedures for electronic information systems that maintain electronic protected health information to allow access only to those persons or software programs that have been granted access.
- Implementation:
- Unique user identification (Required). Assign a unique name and/or number for identifying and tracking user identity.
- Emergency access procedure (Required). Establish (and implement as needed) procedures for obtaining necessary electronic protected health information during an emergency.
- Automatic logoff (Addressable). Implement electronic procedures that terminate an electronic session after a predetermined time of inactivity.
- Automatic logoff (Addressable). Implement electronic procedures that terminate an electronic session after a predetermined time of inactivity.
See Section 164.312 - Technical safeguards for the full list of specifications.
Payment Card Industry (PCI)
Require cardholder data security as part of the Data Security Standard (DSS) that is enforced by Visa and MasterCard.
Data Protection Act (DPA)
Requires all public and private organizations that operate in the UK, to protect personal data in databases, applications, and endpoint devices.
Personally Identifiable Information (PII)
Requires that sensitive information that can be used to identify an individual should be accessed on a strict, need-to-know basis and is required to be protected by most US states, the UK and the EU.
General Data Protection Regulation (GDPR)
A regulation law the EU put in place that requires data protection and privacy for all individuals within the European Union. It also reaches to personal data outside the EU.
Supported Field Types
OrgTools supports data masking for the following field types:
- Boolean
- Currency
- Date
- Date Time
- Double
- Encrypted string
- Number
- Location
- Multi-Pick List
- Percent
- Phone
- Pick List
- String / Text Area
- Time
- URL
For more information, see Creating a Data Mask.
Data Masking Definitions
OrgTools allows you to mask data at the organization level, the project, level and/or the data template level. It’s best practice to set a data masking definition at the organization level to mask data that is commonly regulated to ensure that all sensitive data is consistently masked across the entire organization.
There are two ways to create data masks in OrgTools.
- To create a data mask at the organization or project level, go to Organization Settings.
- To create a data mask for a specific data template, go to Data Template.
Important: Data mask definitions created at the organizational or project level will take precedence over those created inside the current data template. For example, the admin of an organization may have created a data mask definition to mask social security number fields using a particular regular expression pattern or substitution values. Later, a developer also be adding a data mask definition to mask social security number fields with a different regular expression pattern or substitution. The data mask definition created by the admin will be the one applied.
Deterministic and Non-Deterministic Masking
Data mask substitutions can be both deterministic and non-deterministic. Deterministic means that a given input value from the source environment will always map to the same output value in the destination environment after a data mask is applied.
For example, if the email john@www.sfapex.com is masked as test@www.sfapex.com, then every occurance of john@www.sfapex.com in the data copy will be masked as test@www.sfapex.com.
Creating a Data Mask
Apply Data Mask to Project or Organization
Step 1. Under the Applies To drop down, choose the project or organization you would like to create a data mask definition for. This data mask definition will apply to any data templates created within that organization or project.
![]()
Step 2. Click Create.
In the Data Mask window, there are three steps in the process of creating a data mask:
- Select Object.Field
- Mask Type
- Test Data Mask
Select Object.Field
Step 3. Complete the following fields:
- Projects - Select the project that will contain your data mask.
- Environments - Select a source environment. All of the environments you have added in the Environment Hub will be displayed here.
- Search By Field Name - Press the Enter key to populate search results.
- Search Result - Click on the field you would like to include and click the ▶ arrow to add it under Selected Object.Field. To deselect a field, use the ◀ arrow.
- Selected Object.Field - Confirm that your desired fields are added here.
Step 4. When you are finished adding fields, click Mask Type at the top of the window to continue.
Mask Type
Step 5. Choose between the following four data mask types:
Regular Expression
In the input field for Regular Expression, you can either enter your own custom pattern or choose one from a list of preset regular expressions by clicking Browse Library. Included in this list are patterns for credit card, social security, and email. For more information on creating regular expressions, see Regular Expressions.
Click Apply to add the desired regular expression pattern.
Based on the number of grouping in the regular expression you provided, there will be that same number of input fields for substitutions for you to add. For example, the regular expression pattern for social security numbers below has 3 groupings and so 3 field inputs will be available to add substitutions in.
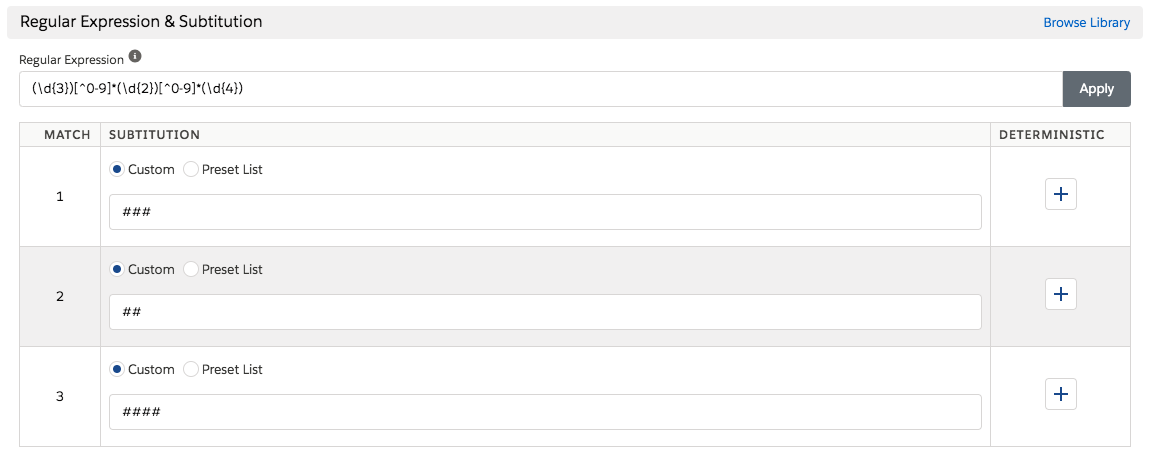
To add substitutions, you have the option to either add a custom value or add values from a preset list.
You may have noticed the @ and # characters used in the substitutions fields when selecting patterns from the preset regular expressions library.
The @ symbol represents alpha characters, i.e., characters that are uppercase or lowercase.
The # symbol represents all whole numbers.
To select values from a preset list created earlier, click Preset List. To create and manage preset lists, go to Organization Settings under Data Mask. See Creating List Values.
If you would like to make the values to be masked deterministic, click the plus sign to the right.
For more information, see Deterministic and Non-Deterministic Masking.
Numeric Range
Limit the range of numbers using the Start and End input fields. Choose whether data should be deterministic using the checkbox located here.
Date Range
Limit date range using Start and End inputs fields. Choose whether data should be deterministic using the checkbox located here.
Automatic
Choosing automatic will generate random values for the following field types:
|
Field Type |
Description |
|
Boolean |
True or false value. |
|
|
String value with 1-20 characters before the @ symbol and 1-20 characters for the domain name. |
|
Currency |
Value based on decimal places specified for the field. Note: decimal places indicates all digits after the decimal point and length indicates total digits. |
|
Date |
Value between January 1, 1970 and January 1, 2090, in YYYY-MM-DD format. |
|
Date Time |
Value between January 1, 1970 and January 1, 2090, in YYYY-MM-DDThh:mm:ssZ format. |
|
Double |
Value based on decimal place and length specified for field. |
|
Encrypted string |
Value based on 20, lowercase and uppercase, alphabetical characters. |
|
Number |
Value based on number of digits specified (length), using negative numbers for the starting range and negative numbers for the ending range. E.g. if length specified is 3, number would be generated between -999 and 999. |
|
Location |
Value based on valid range for latitude (-89 to +89) and valid range for longitude (-179 to +179). |
|
Multi-Pick List |
Value from 1 to N from active pick list values. E.g. For pick list Favorite Color, one result can be the following: Red;Yellow;Blue; |
|
Percent |
Value based on decimal places specified for the field. |
|
Phone |
Value based on numbers formatted as XXX-XXX-XXX. |
|
Pick List |
Value based on active pick list values. If it’s a dependent pick list, a random value is chosen. If it’s a dependent pick list and there is not a parent value, a random value is generated. If it’s a dependent pick list and there is a parent value, its corresponding child values are selected. |
|
String / Text Area |
Value of alphabetical characters based on length specified on field. |
|
Time |
Value based on minimum date time to maximum date time, or within 24 hours, in YYYY-MM-DD hh:mm:ss format. |
|
URL |
Domain name value is a string between 3-20 characters. E.g. http://www.aFE22dAGFvc.com. |
Make sure to test the data mask type you select in Test at the bottom of the modal to ensure the desired output.
Test Data Mask
Step 6. Select an object from the dropdown and provide a WHERE clause. The original values from the source org and the masked values will appear side by side. Confirm this is correct and click Save.
--
Creating List Values
Note: This functionality is only available in the Organization Settings under Data Mask.
List values allow you to import custom values for substitution in data translations or data masks. For example, you may create a RegEx pattern to match a certain data set and use a list of values to substitute for the match.
To create and manage lists, click List Values.
In the Data Mask List window, click the plus button to add a List Name. Click the save button to continue. To edit the name of the list click the pencil button. To delete a list, click the trash button.
There are two ways to add values to the list:
Option 1 - Import Values
Click Upload Files. File format must be .csv and formatted as follows. A maximum of 3,000 values can be uploaded in a single import operation.
myFirstImport.csv
	\w,test

	\s,fefe
Or
myFirstImport.csv
\w,test,\s,eit
The following are important guidelines for uploading files:
- File format must be .csv
- File Names
- Each file's file name must match the object's API name. The API name is the label name with any spaces converted to underscores (_) and suffixed with __c. The file extension should be .csv (i.e. comma-separated values).
- For example, a file containing Ids for Accounts (a standard object), would be named Account.csv. A file containing Ids for MyCustomObjects (custom objects), would be named MyCustomObject__c.csv.
Remove and Edit Data Masks
Option 2 - Add Manually
Under values, click the plus button to the right. In the empty row, click the pencil button on the right to edit the value and hit the the Enter key to save.
When finished adding values, click Save to exit the window.