Data Templates
Understanding Object Relationships
In Salesforce, objects can be related to one another through lookup and master-detail fields (fields of type ‘reference’). The relationships are defined through the field’s metadata on the object.
When users create records in these related objects, some of the records may have blank lookup values. These records may also reference other child and parent records who also may have parent records. To make things even more complicated, the referenced records may also have fields that reference other records on the same object.
Within a Data Template, users can select records and have the application automatically discover the related parent and child records. The steps taken by the application to discover the related records can be shown here:
Child Record Levels Diagram
The following relationship diagram is an example to illustrate how selecting child records works.
It can be read as: “There is a Project which has Project Team Members and a set of Deliverables. Each Project Team Member is a Team Member who has Resources. Each Team Member also has a Physical Location.”
Selecting a Project record and choosing:
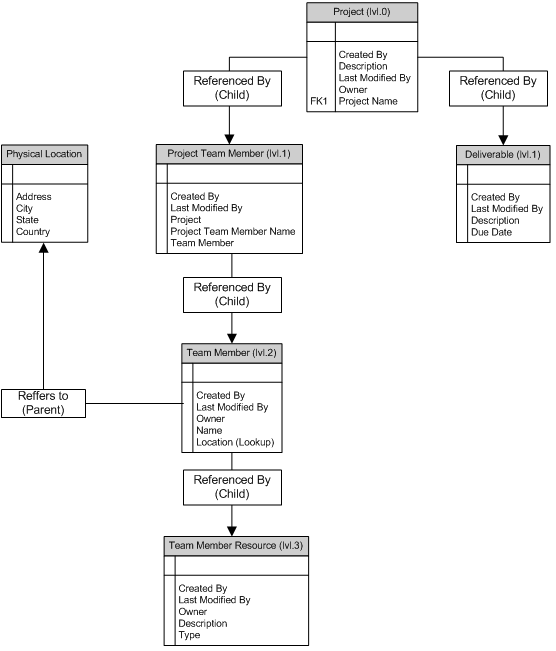
- None
- Includes Project record
- Does not include Project Team Member, Deliverable, Team Member, Physical Location, or Team Member Resource.
- 1 Level
- Includes the Project, Project Team Member and Deliverable records
- Does not include Team Member, Physical Location, or Team Member Resource.
- 2 Level
- Includes the Project, Project Team Member, Deliverable, Team Member, and Physical Location (because it always automatically include parent records) records.
- Does not include Team Member Resource.
- 3 Level
- Includes the related records from all of the objects shown.
- All Object Childs
- Includes the related records from all of the objects shown.
- Custom
- Includes your custom selection of the related records to include. Use the above definitions to define your selection.
Note: the parent records for a selected child record will always be included because the child can’t exist without the parent (i.e. orphan records).
Extract, Transform, Load Process Overview
Data copies are created using an extract, transform, load procedure. The following explains what happens during each stage in the ETL process.
Extract
This stage extracts records from the source specified in the data template. When determining which fields to query, we only consider fields that exist on both the source and destination and are accessible by the user (field permissions).
Transform
We take the query result from the extraction stage and apply transform procedures in the following order:
- Data Translation
- Data Mask
Note: If there is a data translation and data mask procedure created for the same object field, the data mask operation would occur on the translated value.
Load
This final stage writes the records to the destination org:
The application will determine if the record(s) should be updated or created depending on the external id settings.
If the records being copied lock other records, the application will keep track of the locked records and automatically sequence the loading of the records. The following types of record locking are considered by the application:
|
Lock Type |
Resolution |
|
Master-Detail Relationships |
Application will track locked master records and sequence the insertion accordingly. |
|
Lookup Relationships |
Application will track the locked lookup records when the lookup field is set to “Don't allow deletion of the lookup record that's part of a lookup relationship” and sequence the insertion accordingly. |
|
Roll-up Summary Fields |
Application will track locked master records and sequence the insertion accordingly. |
|
Triggers |
Triggers are by default disabled by the application during the data copy. |
|
Workflow Rules |
Workflows are by default disabled by the application during the data copy. |
|
Group Membership Locks |
Not considered by the application during the data copy. See Group Membership Locks for more information. |
Please see Salesforce Record Locking for more information on record locking.
Creating a Data Template
|
PROFILE PERMISSIONS REQUIRED |
|
Manage Data Templates, Perform Data Copy |
If you have been invited to a project, you must add the source and destination environments that will be used by any data templates in the Environment Hub. See Adding a Source and Destination Environment.
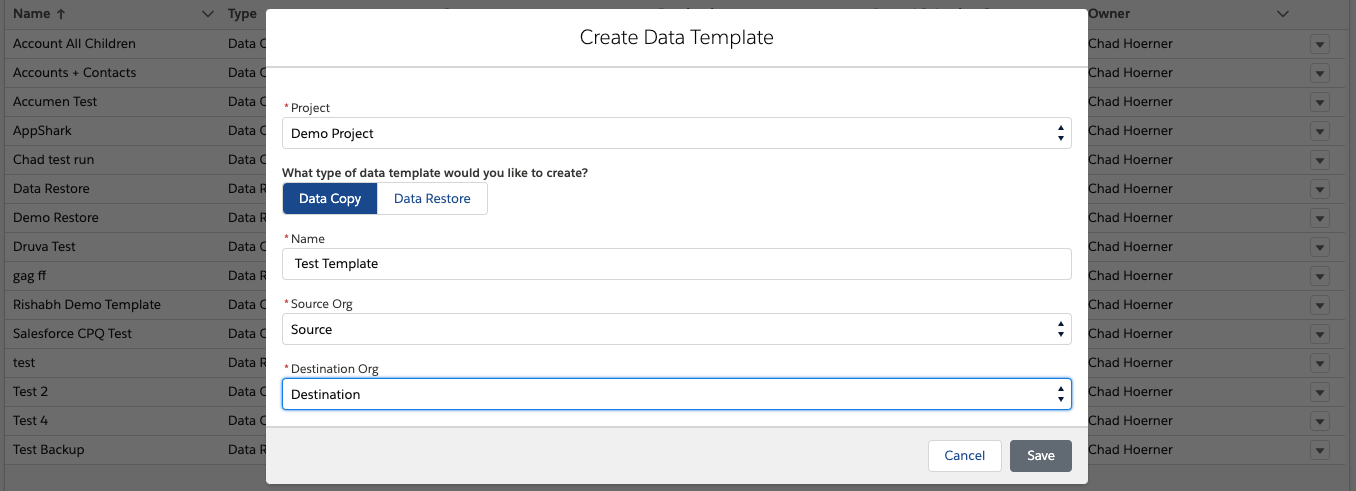
Click the New button on the top right. In the Create Data Template window, complete the following fields:
- Project: Projects are designed to be used as an organization tool to gather all of the data templates and users associated with one project in one place. Projects can be created in the Organization Settings tab under Settings.
- Name: Must be a unique template name within the project.
- Source Org
- Destination Org
Inside the Data Template
The data template page is where users will select their data set to copy as well as apply any data transformations. The data template page is broken into 3 different levels which are described below:
The top part of the data template page shows the source and destination environments for this specific data copy. User can change the source or destination by clicking the drop-down and selecting another environment (See Adding a Source and Destination Environment for information on how to add environments.)
The middle part of the data template page displays 2 progress bars, one for data and the other for files.
- Blue: Existing data and file size inside the destination environment.
- Red: Data and file size selected to copy.
- Green: Free space inside the destination environment.
The bottom part of the data template page is the methods of selection and data template settings. There are 3 ways of selecting data inside OrgTools and each is described below.
- Record Selection
- Query-Based Selection
- Percentage-Based Selection
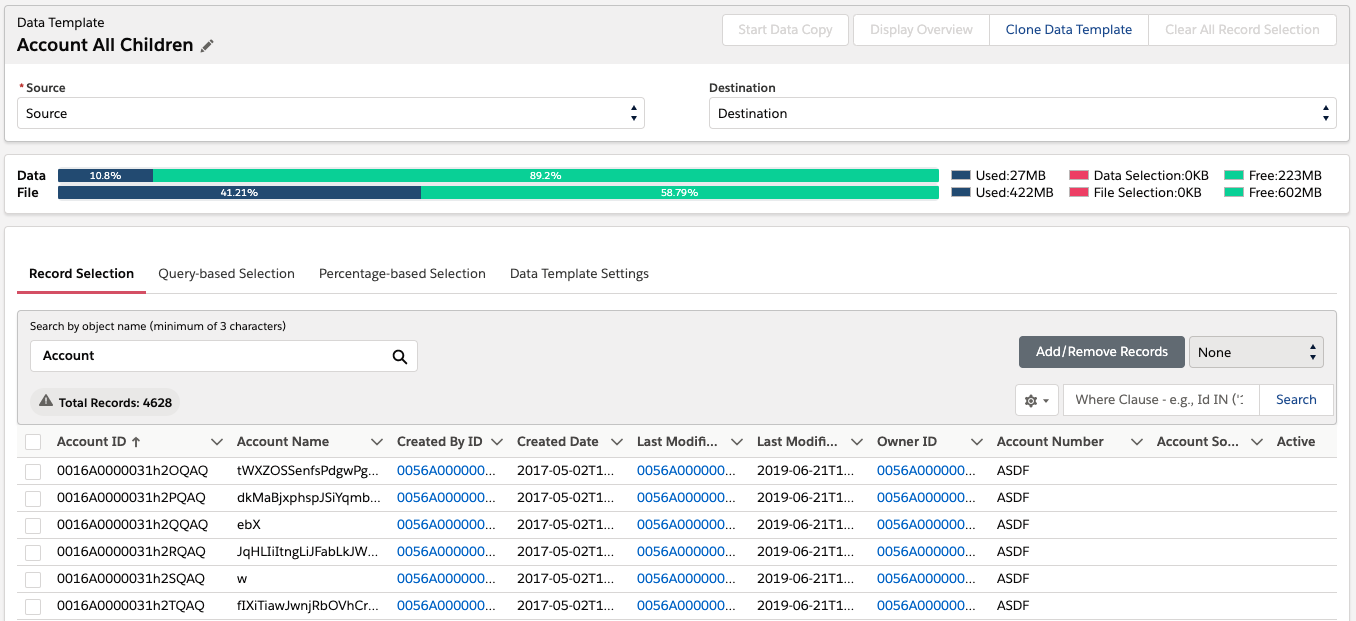
Record Selection
Record Selection allows user to pick individual records plus all related records to copy.
Step 1: Select the object from the search bar for which you would like to select records. This will allow all the records for that object to appear in the table below.
Step 2: Click the checkbox next to record or records you would like to copy. User can type in a SOQL statement in the text box below the Add/Remove Records button on the right side (Users DON'T have to type the WHERE in the SOQL statement).
Step 3: Select the level of relationship to copy with the selected records.
- All Child Objects
- None
- 1 Level
- 2 Levels
- 3 Levels
- Custom
Step 4: Click Add/Remove Recordsbutton to discover the records from the source environment.
The gear icon to the left of the WHERE clause provides control over the table of records. Users have 2 options described below:
Column Selection
This allows users to select the columns that will display in the record table. All fields for the object are available on the left list and all selected fields are in the right list. Highlight the field and move to the other list by using the left and right arrows. Use the up and down arrows to determine the order of the columns.
**The table can hold at most 20 fields.
Show Selected Rows
This option will display only the records for the designated object that have been selected for migration.
Query-based selection
Select records dynamically by creating a query. If records are altered in your source environment, the data copy will still be able to run by using this method.
Add Query
User can query records for a single object.Step 1. Click Add Query.
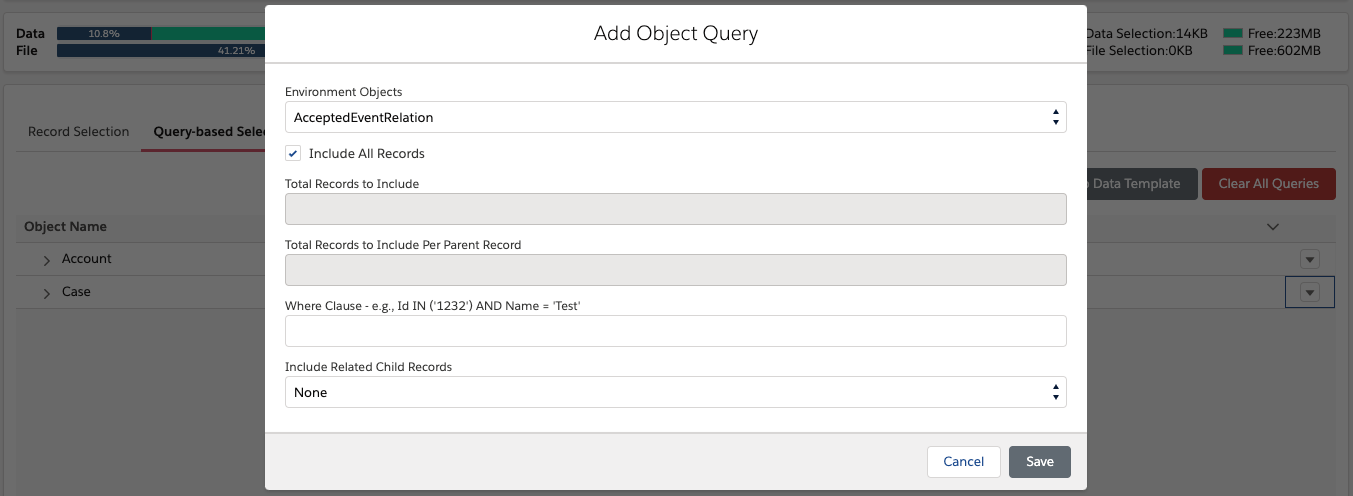
Step 2. In the Add Object Query window, complete the following fields:
- Environment Object - select the object for which to query
- Include All Records - discover all records that meet the search criteria. Uncheck this box to specify a total number of records to include.
- Total Records to Include - only discover a specified number of records that meet the search criteria.
- Total Records to Include Per Parent Record - e.g., if the parent record contains 10 children records, you can limit to only include 5.
- WHERE Clause - e.g., Id IN ('1232') AND Name = 'Test' or see Condition Expression Syntax. Note: do not include the ‘WHERE’ keyword.
- Include Related Child Records - choose how many levels of child records to include. Note: be careful when selecting All Child Objects as the record may be part of a large relationship chain. See Understanding Object Relationships for additional information.
Step 3. Click Save.
All queries will show in the bottom table.
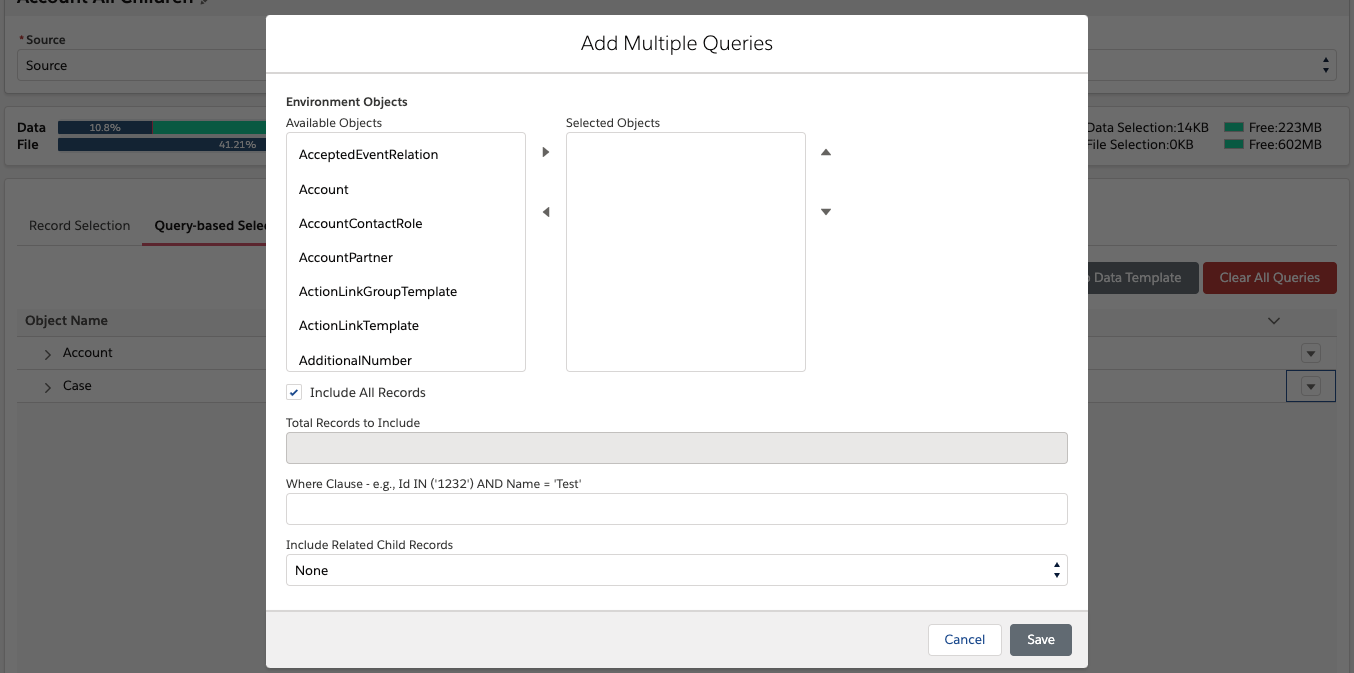
Add Multiple Queries
User can use the same query to discover records across multiple object.Step 1. Click Add Multiple Queries.
Step 2. In the Add Multiple Queries window, complete the following fields:
- Environment Object - Select all objects to query by selecting the objects in the Available Objects list and using the arrows to move them into the Selected Object list.
- Include All Records - discover all records that meet the search criteria. Uncheck this box to specify a total number of records to include.
- Total Records to Include - only discover a specified number of records that meet the search criteria.
- WHERE Clause - e.g., Id IN ('1232') AND Name = 'Test' or see Condition Expression Syntax. Note: do not include the ‘WHERE’ keyword.
- Include Related Child Records - choose how many levels of child records to include. Note: be careful when selecting All Child Objects as the record may be part of a large relationship chain. See Understanding Object Relationships for additional information.
Step 3. Click Save.
All queries will show in the bottom table.
Add to Data Template
Clicking the Add to Data Templates will start the discovering the records from the source environment.
Clear All Queries
Clicking the Clear All Queries button will delete all queries listed in the bottom table.
Query Row Action
Every query in the bottom table will have a Row Action button on the right of the row. The Row Action gives users 3 options which are described below.Add Sub-Query - a sub-query allows users to query child records related to the parent object. e.g., User can query Cases related to specific Accounts.
The Add Object Query window will appear. Please follow the steps as described in the Add Query section above.
Edit Query - the Add Object Query window will appear allowing users to edit the existing query.
Delete Query - User can delete the selected query.
Percentage-based selection
Use this method when trying to copy an amount of data without regard for which specific records are selected.
Step 1. Select the source environment object name by using search or selecting from the drop down in the input field.
In the horizontal bar graph directly below, the object and all of its related objects will appear demonstrating their relative record count. If you would like to include the related objects in the data copy, select the Include Related Objects checkbox.
Step 2. The slider above the bar graph allows you to choose the percentage of total records in the object you would like to copy. As you move the slider, you are able to see the total record amount that will be copied next to Records to Copy.

The Lock Object Percentage checkbox on any object, allows you to keep that object’s percentage constant as you alter the percentage on other records.
Settings
Overview
The objects displayed here have preconfigured settings for the following:
- Excluded
- External ID
- Excluded Fields
- Data Translations
- Data Masks
These are applied by default when creating a Data Template. For example, objects like AccountContactRelation, ApexClass, ApexPage, etc, will be excluded. You can change these using the Exclude Objects and Exclude Fields tabs.
External ID
External IDs are used by Salesforce to reconcile or create the parent-child relationships between the source and target object. When a field is marked with an External ID, its values can be used to match and associate related records to one another. This used by OrgTools to determine if the record already exists on the destination org. As a result, OrgTools is able to prevent duplicate inserts by performing an update operation in place of an insert operation.
When to create External IDs
If you have manually created records on the destination org or used another application to load data into the destination org, you must mark fields with external IDs. For example, you may be importing data from a .csv file with records that already exist in the destination environment and that don’t have a Salesforce record ID. To prevent creating a duplicate record, you would mark a field with an external ID in order to map the source and destination fields for that record.
If the data was populated through a sandbox refresh (i.e. Partial or Full Sandbox), or by the OrgTools application, you do not have to define External IDs as the ID mapping between the source and destination is automatically tracked internally by the application.
Note: external IDs supports composite keys.
Creating an External ID
Step 1. Click New External ID.
Step 2. In the External ID Form window, complete the following fields:
- Environment Object
- Source Field
- Destination Field
- Source RegEx: you have the option to apply a regular expression to the source field in order for its value to match with the destination field.
- Source Substitution: the value to replace the regular expression matched value.
Step 3. Click Save to continue.
Step 4. View or edit external IDs. (Optional)
Click on the object name to see a drop down of the external ID you have added. You can add additional external IDs for the same object by clicking the + button. Click to test the object’s RegEx. Click to remove all object external IDs. After you make an update to an external ID, click to save.
Exclude Objects
Exclude Objects is used to exclude any objects you may not want copied into the destination org. This can be because of data storage limitations or to filter for sensitive data.
If your object is not listed, this may be as a result of the object not having the following object and field-level permissions set to true: queryable, creatable, and updateable. Queryable is required to be true and either creatable or updatable must be true for OrgTools to be able to perform upsert and update operations.
Step 1. Enter object name. The value entered here will further filter from the selected alpha character.
Step 2. Select desired field and click Exclude or Include.
Note: you cannot exclude objects that have a positive record count. In order to exclude that object, perform an exclude record operation first. You can do so under the Record Selection tab.
Exclude Fields
Select fields on an object to exclude or include.
By default, OrgTools excludes fields that are encrypted, do not have a type of Blob, and are not calculated. Change these settings on the field in your source environment to see the fields populate in OrgTools.
Step 1. Enter an object name in the search bar. You can filter your search results down further by clicking on a letter.
Step 2. Select desired field and click Exclude or Include.
Data Translations
Transform source object field values and replace them with data that fits the requirements of the destination environment. Data translations are performed using the regular expressions you provide.
Step 1. Enter an object name in the search input using Search By Object. Alternatively, select Search Across Objects to search by field name.
Step 2. There are two ways to create regular expressions and substitutions in order to translate data.
Option 1 - Add Manually
Step 3. Select the desired field names and click Edit. In the Add Data Translation window, the object fields you choose will be displayed.
Step 4. Add the regular expression and its substitution pair in the text inputs and click Add.
To delete a pair, click Remove.
If multiple fields are selected, this window will display the data translations which are common amongst the selected fields.
Step 5. When finished, click Save.
Option 2 - Upload Files
Step 3. Select the desired field names and click Upload Files. File format must be .csv and formatted as follows:
myFirstImport.csv
\w,test

\s,fefe
Or
myFirstImport.csv
\w,test,\s,eit
Step 4. Click Edit to add a regular expression and a substitution pair for the data translation.
To remove a data translation, select the field name(s) and click Delete on the upper-right corner.
See Regular Expressions.
Data Mask
Manage and create data masks for projects, in contrast to creating global data masks in Organization Settings.
These data masks will be applicable only for the current data template. If organizational level or project level data masks are defined for the same fields as a data template level data mask, they will take precedence.
For a step-by-step guide and further information on creating data masks, see Data Masking.
Validations
By default, OrgTools will disable the following validation types:
Validation Rules
Required Fields
Lookup Filters
Allow Re-parenting Fields
Unique Fields
Hidden Fields
Read-Only Fields
Inaccessible Record Types
Triggers
Flows
Duplicate Rules
Workflows
Note: Metadata defined in managed packages cannot be disabled for certain metadata types. For example, if a managed package validation rule exists on a Standard Object, this would be disabled by the application. Conversely, if a managed package trigger exists, the application cannot disable this trigger because it is not modifiable by anyone other than the managed package vendor.
Note: To inactivate a trigger in Salesforce, the trigger must not have any active Apex Scheduled Jobs (i.e. Future methods) running while the application is inactivating the trigger.
Triggers are deployed using the Deploy() method of the Metadata API. All other validation types are enabled/disabled using CRUD operations.
The application uses the latest API version (i.e. Generally Available (GA)) when working with metadata.
Note: If a default record type is not defined for an object, it will automatically set the first record type as default.
Use this section to keep individual validations / validation types enabled during the data copy process. During a data copy, the application will only disable validations related to objects that are part of the data copy process (with the exception of Process Builder and Visual Flows).
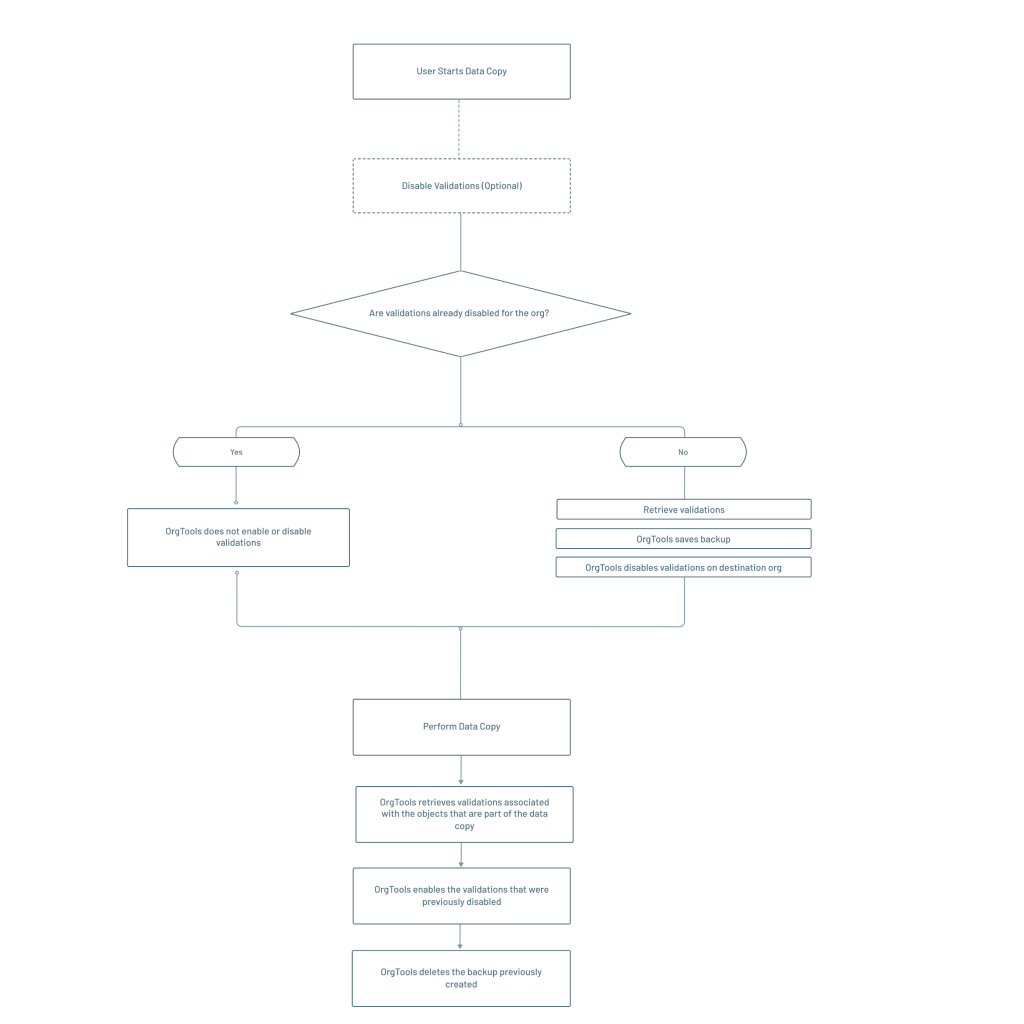
- User starts Data Copy. In the Data Copy Confirmation window, checkmark the “Disable destination metadata during data copy.” checkbox to disable the validations during the data copy process (note: this option will be grayed out if the validations on the destination org are already disabled).
- If the validations are already disabled for the org, the application does not disable/re-enable the validations.
- If validations are not already disabled, the application will retrieve the validations associated to the objects that are being copied.
- OrgTools will save a backup of the validations which will be disabled.
- OrgTools will disable the validations on the destination org.
- Performs Data Copy
- OrgTools will retrieve the validations associated to the objects that are part of the data copy.
- OrgTools will enable the validations that were previously disabled in step 5.
- OrgTools will delete the backup taken on step 4.
To disable or enable all validations for an org, go to the Environment Hub Window, click the drop down arrow to the far right of the org’s row, and click Disable Validations.