Data Backup
Necessity of Data Backups
Data protection is a shared responsibility between customer and Salesforce. Salesforce has built the most secure platform in the industry. It is the customer's responsibility to protect data from user-inflicted loss or corruption.
sfApex's backup solution will take a daily backup of users Salesforce data to capture any created, updated, and deleted records. This let's users capture every change inside of Salesforce and severely reduces the recovery point from the manual weekly download.
Backup Storage
sfApex stores all backup files in an Amazon S3 bucket. Customers can store their backup files with sfApex, or Customers can provide credentials for their own S3 bucket if they would like to maintain ownership of their backup files.
Note: If user would like to store their own backup files, Storage in a S3 bucket is very cheap. The cost is roughly $0.02 per GB per month for under 50TB of storage.
Data Backup Tab
Under the Data Backup tab, user can create and edit backup projects, take ad hoc backups, perform GDPR tasks, and view backup dashboards.

New Backup Job
The Create Backup Job modal will open the first time you click the Data Backup tabs if there are no previous jobs created. If you would like to create a new backup job, click the New button in the top right corner.
Users will complete all the tabs in the modal. When all tabs have been completed, click the Save button. Your data backup is now ready to run at the scheduled time.
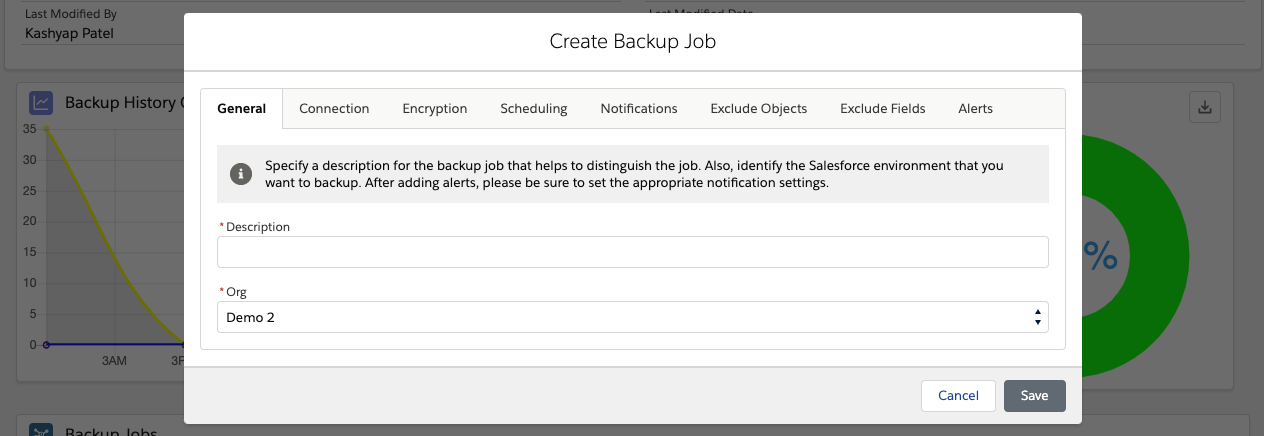
General
Step 1: Add a name or description to describe the job. Typically this is the org name and/or region.
Step 2: Select the environment which you would like to backup from the drop-down list. Add environments through the Environment Hub.
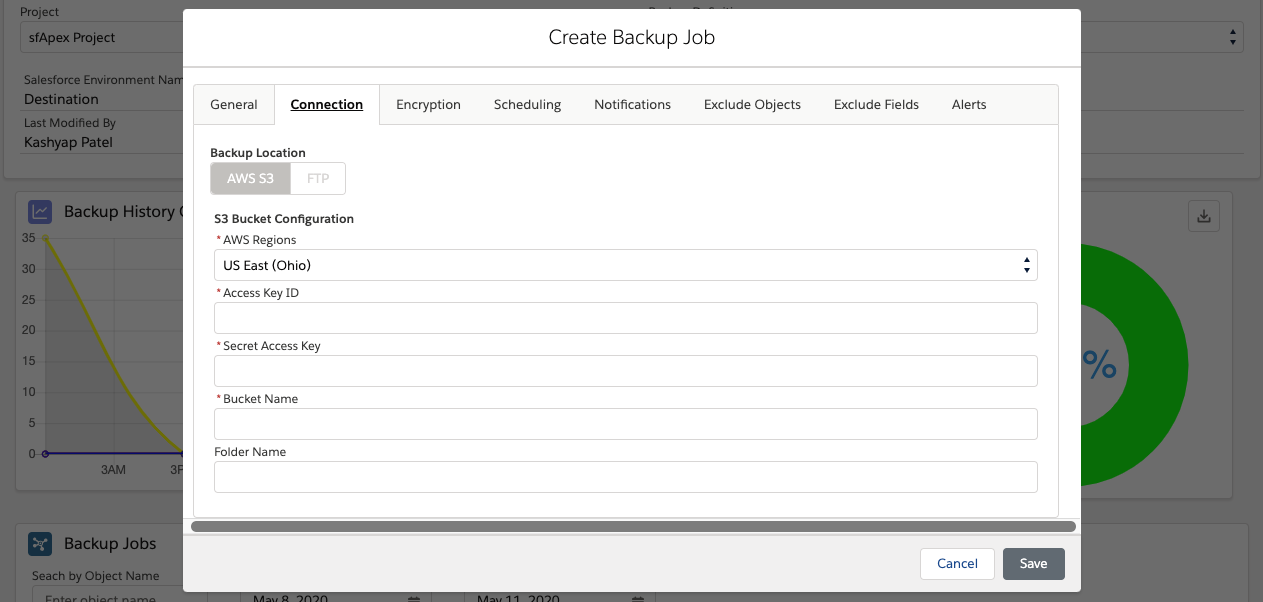
Connection
Users will input the AWS S3 bucket credentials where they would like to store their backup files. User can provide their own credentials or ask for credentials from sfApex.
- AWS Region: AWS provides multiple regions all over the world to choose where to store backup files. Locations include US, Europe, Asia Pac, Canada, South America, and Middle East.
- Access Key ID: Input Access Key ID for company S3 bucket or ID provided by sfApex.
- Secret Access Key: Input Secret Access Key for company S3 bucket or key provided by sfApex.
- Bucket Name: Input the Bucket Name for your S3 Bucket or the name provided by sfApex.
- Folder Name: Input folder name if you create a separate folder in your S3 bucket or the folder name provided by sfApex.
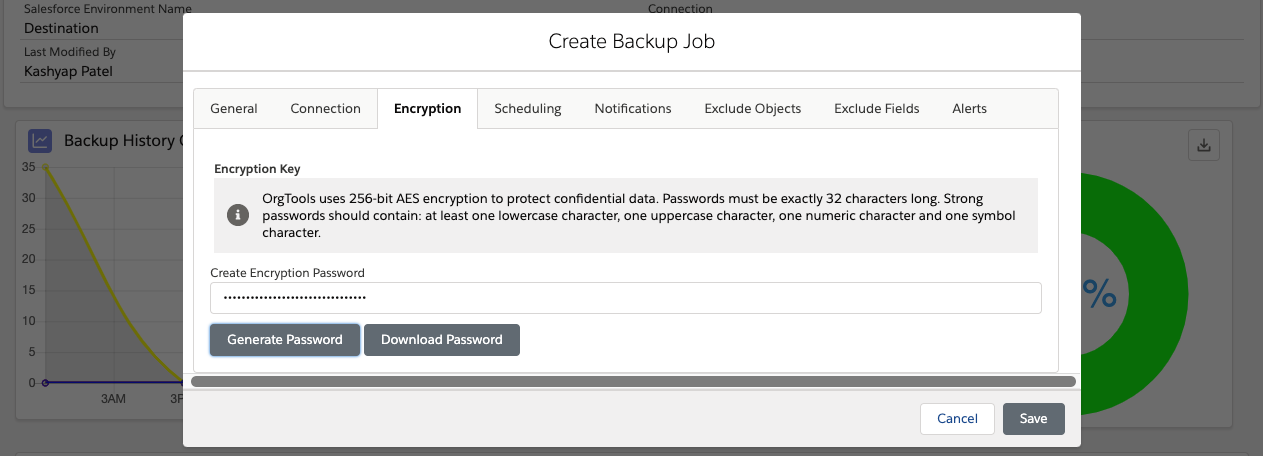
Encryption
OrgTools uses 256-bit AES encryption to protect confidential data at rest. Password should be 32 characters long and should contain one lower case character, one upper case character, one number, and one symbol.
- Generate Password: Click this button for OrgTools to generate a password for you. Password will show as dots in the field.
- Download Password: Click this button to download the password to save for later use.
Scheduling
OrgTools will take a daily backup of your Salesforce data. It will start with a full backup of all the data inside of your Salesforce org (standard, custom, and managed package objects along with attachments, content, knowledge articles, and chatter). It will perform incremental backups everyday after the initial full backup. The incremental backups capture the daily records created, updated, and deleted.
- Date: Select the date you would like the initial full backup to run
- Time: Select the time of day you would like the backups to run daily.
- High Frequency: Select the incremental interval if you wish to run a backup more than once a day. Options include:
- 15 minutes
- 30 minutes
- 1 hour
- 2 hours
- 4 hours
- 8 hours
- 12 hours
The best time to run data backup is when user activity is low to prevent slow performance. This is typically during the middle of the night.

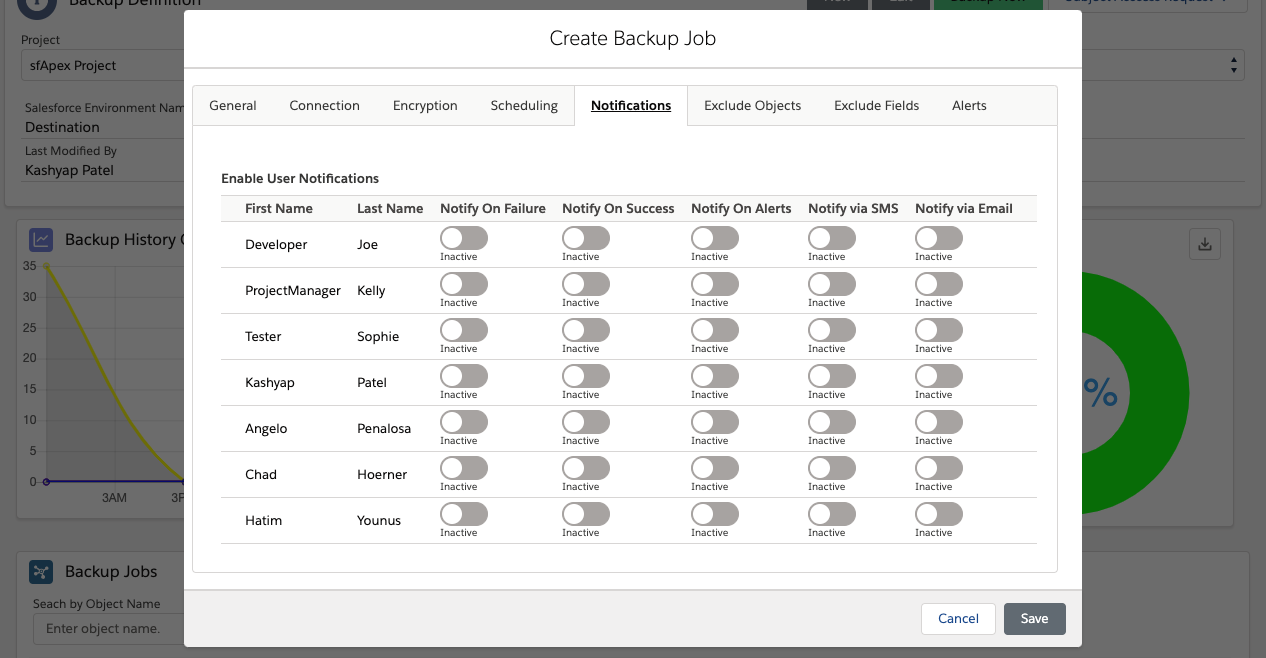
Notification
User can receive notifications for successful and/or failed backups along with any notifications. These notifications can be received through email and/or text.
Move the slider to activate for the type of notification a specific user should receive.
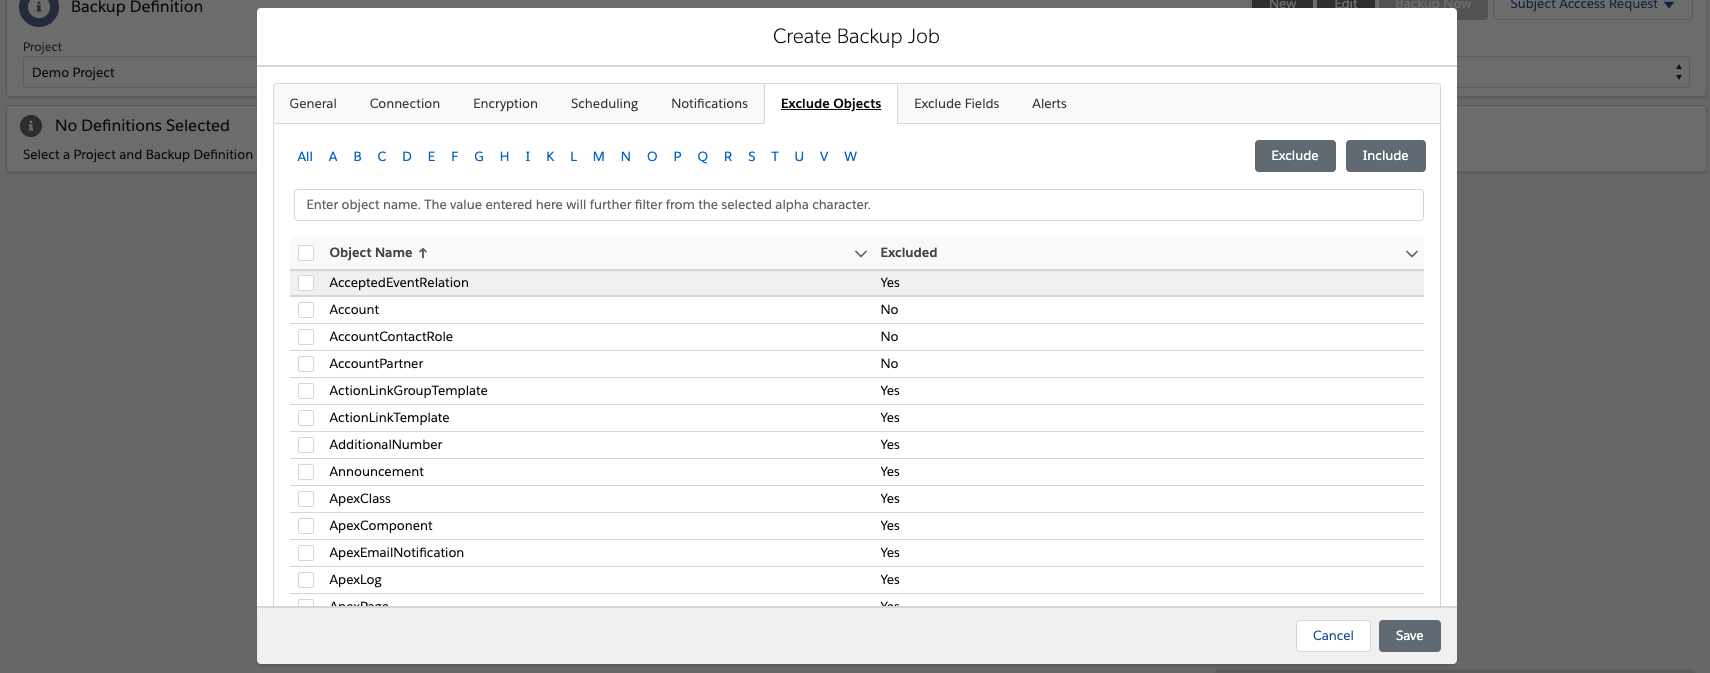
Excluded Objects
User can exclude objects from their backup. Simply check the box next to the object and clicking the Exclude button on the top right.
User can include objects by checking the box next to an excluded object and clicking the Include button on the top right.
By default, OrgTools excludes certain objects from the backup. These are the system objects.
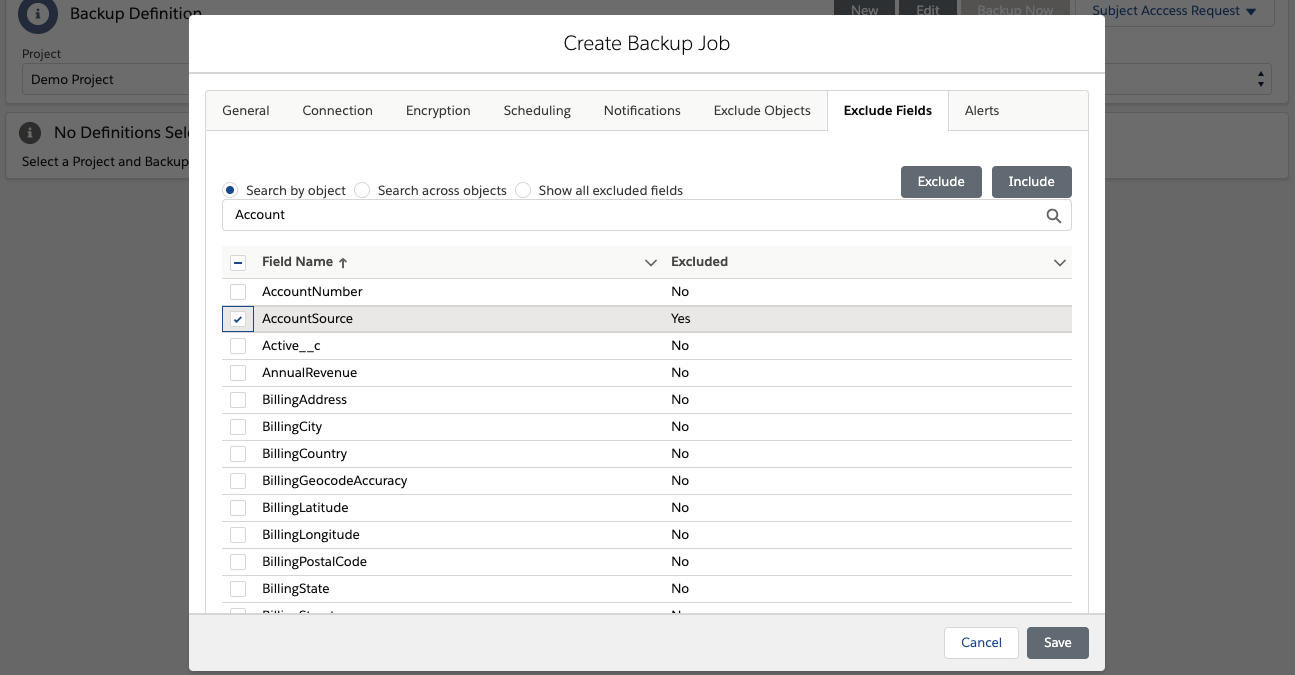
Excluded Fields
User can exclude fields from their backup.
- Step 1: Select the radial button next to Search by Object or Search Across Objects depending how user would like to search for the field.
- Step 2: Enter the object name in text box if search by object or enter the field name if searching across objects.
- Step 3: Check the box next to the field you would like to exclude and click the Exclude button on the top right.
User can include fields by checking the box next to an excluded field and clicking the Include button on the top right.
By default, OrgTools will backup every field on every object.
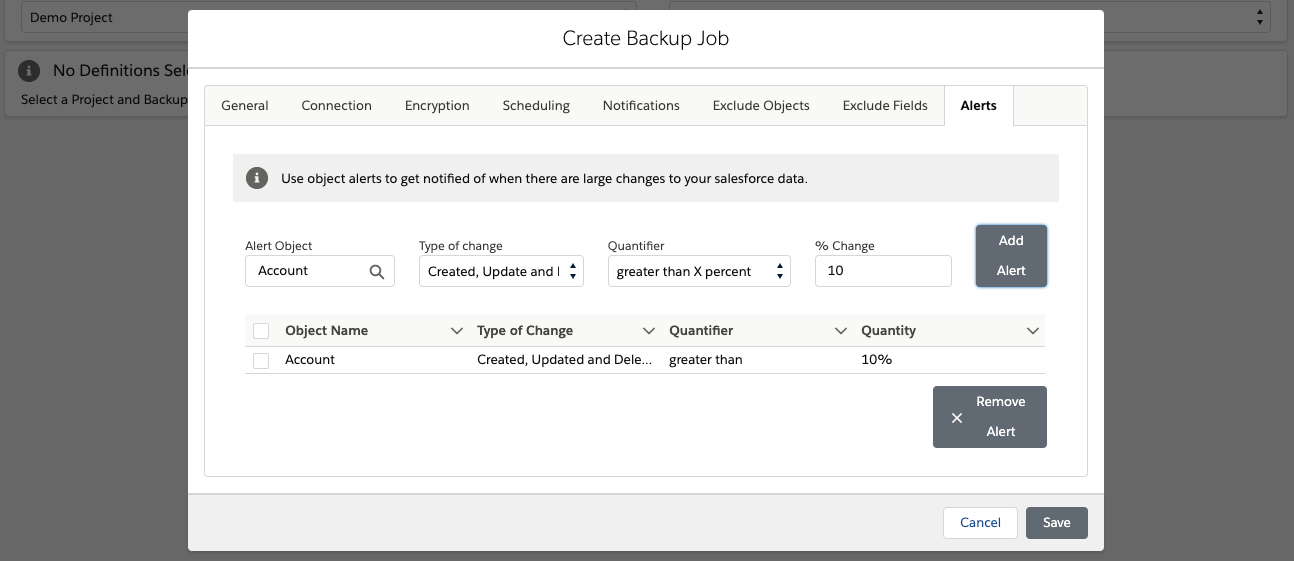
Alerts
Alerts allow users to be notified if there are large changes to specified objects. This helps to notify you if a data loss incident occurred and restore quickly with limited downtime.
- Step 1: Select the object for which you would like to create an alert.
- Step 2: Select the type of change from the drop-down list to be notified about.
- Created
- Updated
- Created and Updated
- Deleted
- Created, Updated, and Deleted
- Step 3: Select the quantifier for the alert.
- Greater than X Percent
- Less than X Percert
- Greater than X Number of Records
- Less than X Number of Records
- Step 4: Input the percentage or number of records to set off the alert.
- Step 5: Click Add Alert button.
- Step 6: Repeat for all necessary objects.
Edit Backup Job
Users have the ability to edit their backup projects if they desire to make any changes.
- Step 1: Select the project in the drop-down menu for which the backup job is under.
- Step 2: Select the Backup Definition from the drop-down for the desired backup job to edit.
- Step 3: Click the Edit button on the top right.
- Step 4: Edit any of the Backup Job tabs as described above.
- Step 5: Click the Save button on the bottom right to save the Backup Job.
Backup Now
The Backup Now button gives users the ability to take ad hoc backups. It is always good procedure to take a backup before a deployment or large data migration to protect existing data in case anything goes wrong.
Ad Hoc Backup of Current Job
- Step 1: Select the project from the drop-down list for which the Backup Definition is placed.
- Step 2: Select the Backup Definition from the drop-down list that you would like to take a backup of.
- Step 3: Click Backup Now to start the backup.
New Ad Hoc Backup Job
- Step 1: Select the project from the drop-down list for which the Backup Definition is placed.
- Step 2: Click the New button.
- Step 3: Complete all the tabs on the modal as described above.
- Step 4: Click Save.
- Step 5: Click Backup Now.
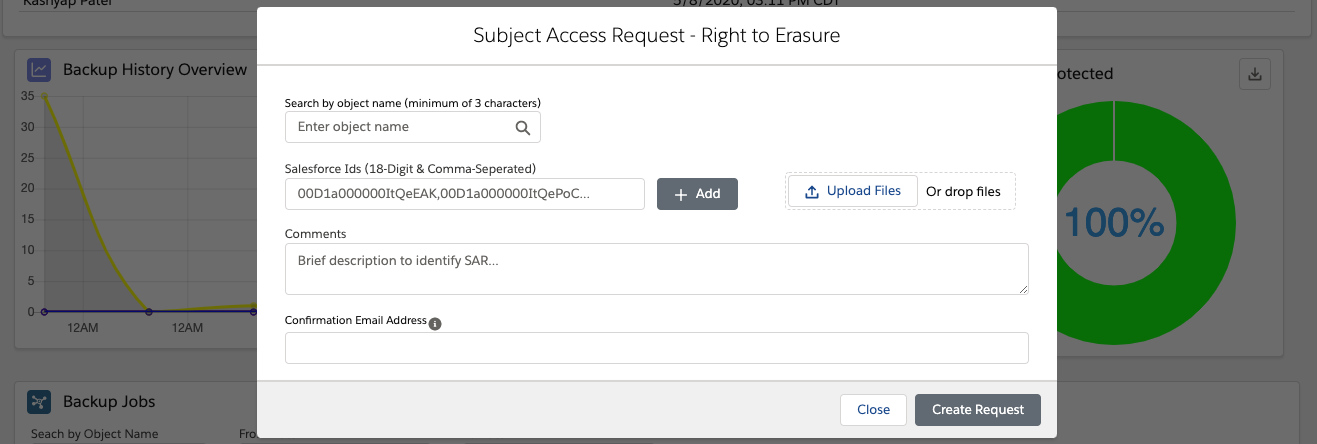
Subject Access Request
The Subject Access Request button helps users stay GDPR compliant with their backups. Users can delete or edit records throughout their backup files.
Forget - Right to Erasure
Use this option to delete records throughout your backup files.
- Step 1: Search for the object for which you would like to delete records.
- Step 2: Input the 18-digit record IDs to delete. Use comma to separate multiple IDs. Users can upload a CSV file if user have a long list of records to delete.
- Step 3: Provide a comment to describe the Subject Access Request
- Step 4: Provide users email address to receive a confirmation email.
- Step 5: Click Create Request to submit the Right to Erasure.
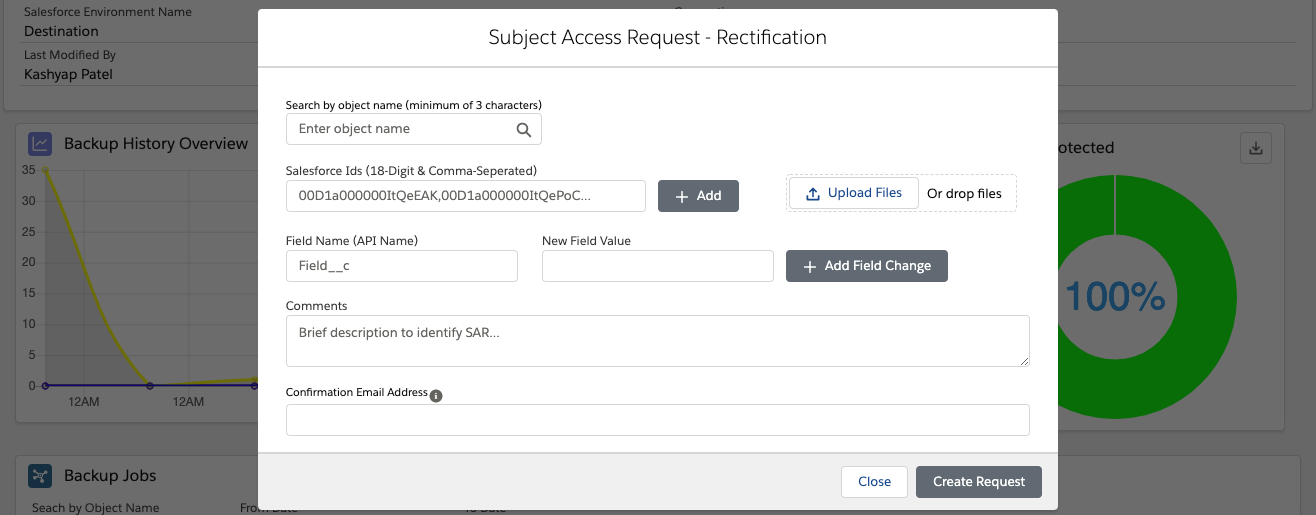
Change - Rectification
Use this option to edit records throughout your backup files.
- Step 1: Search for the object for which you would like to change records.
- Step 2: Input the 18-digit record IDs to delete. Use comma to separate multiple IDs. Users can upload a CSV file if user have a long list of records to delete.
- Step 3: Input the Field API name for the value you wish to change.
- Step 4: Input the new field value.
- Step 5: Click the Add Field Change.
- Step 6: Provide a comment to describe the Subject Access Request.
- Step 7: Input users email address to receive a confirmation email.
- Step 8: Click Create Request to submit the Rectification.
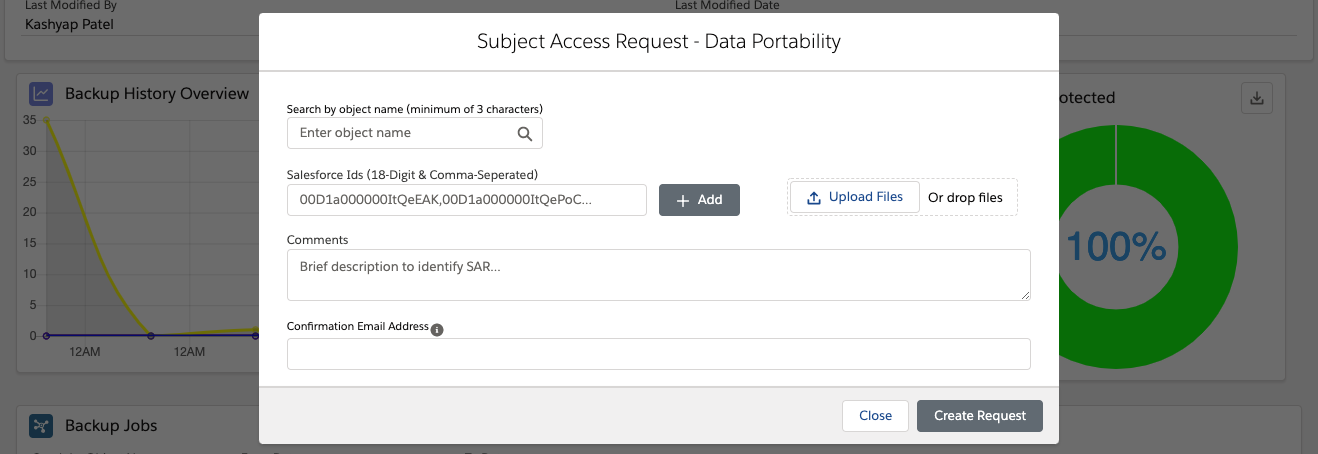
Export - Data Portability
Use this option to export records from your backup files.
- Step 1: Search for the object for which you would like to export records.
- Step 2: Input the 18-digit record IDs to delete. Use comma to separate multiple IDs. Users can upload a CSV file if user have a long list of records to delete.
- Step 3: Provide a comment to describe the Subject Access Request.
- Step 7: Input users email address to receive a confirmation email.
- Step 8: Click Create Request to submit the Rectification.
Review Subject Access Requests
Subject Access Request have a 2 day delay period before the request is completed. Users can click Review Subject Access Requests to see all pending requests.
Data Backup Dashboard
OrgTools provides a dashboard to give a users an overview and information about the daily backups. Below is a breakdown of each chart or table.
Backup History Overview
This chart displays the daily changes inside your Salesforce org. Users can see the count for records created, updated and deleted on that day.
Backup Duration
This chart shows the time it takes to perform the backup each day.
Data Being Protected
This chart shows percentage of data protect inside the backup org. Users want this to be as close to 100% as possible.
User can click the button in the top right to download a CSV file showing the status of each object. Objects that failed to backup will provide a message as to why OrgTools was unable to backup that particular object.
Backup Jobs
This table shows the counts for created, updated, and deleted record for each daily backup. User can click the arrow next to the date to see the counts broken down by individual objects.
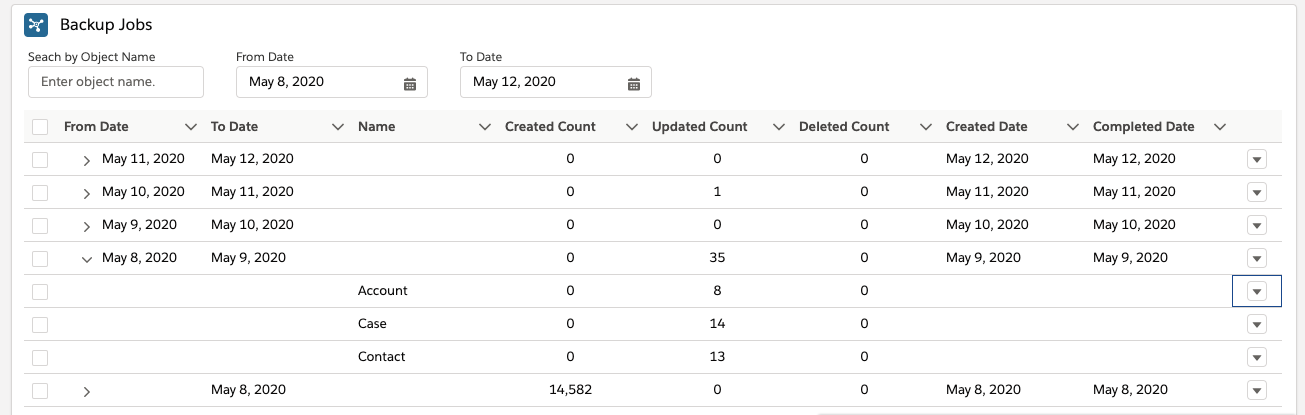
To get more detail, user can click the row action for a particular date to see the exact records that were created, updated, or deleted on that day. User have the options to view the detail records in a modal, download a CSV file, or download a JSON file.