Organization
|
PROFILE PERMISSIONS REQUIRED |
|
Manage Organizations, Manage Settings |
The organization you are currently logged in under will be displayed here. To switch orgs, click the gear icon and select Switch Organization.
Projects
|
PROFILE PERMISSIONS REQUIRED |
|
Manage Projects, Manage Settings |
Projects are designed to be used as an organization tool to gather all of the data templates and users associated with one project in one place.
Creating a Project
Step 1. Click New Project in the upper right corner.
Step 2. In the New Project window, complete the following fields:
- Project Name - Must be unique within the organization.
- Billing Account - To add additional billing accounts, navigate to Accounts under Billing on the left sidebar.
- User - Add users to this project that are already inside the organization. To invite users outside of the organization, click on the drop down arrow the the left on the project’s row and select Invite Users.

- Associated Users - By default, your account will be listed here. To give additional users access, select their name from the user drop down and click Add.
Step 3. Click Save to add the project.
Data Mask
|
PROFILE PERMISSIONS REQUIRED |
|
Manage Global Data Masks, Manage Settings |
For a guide to creating data masks, see Data Masking.
Users
|
PROFILE PERMISSIONS REQUIRED |
|
Manage Users, Manage Settings |
All members located in your organization will be located here. To switch organizations, select the gear and click Switch Organization.
Inviting Users To An Organization
Step 1. Click on the Projects on the left sidebar.
Step 2. Select a specific project and in the row’s drop down and click Invite Users.
Step 3. In the Invite Users window, provide an email address and a user profile, and click Add.
Profiles
|
PROFILE PERMISSIONS REQUIRED |
|
Manage Profiles, Manage Settings |
Permissions
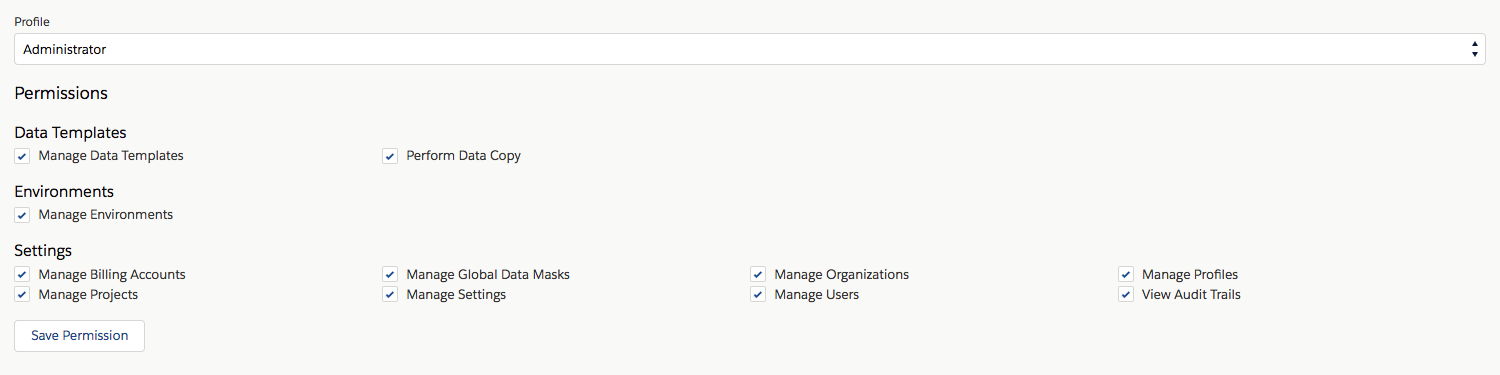
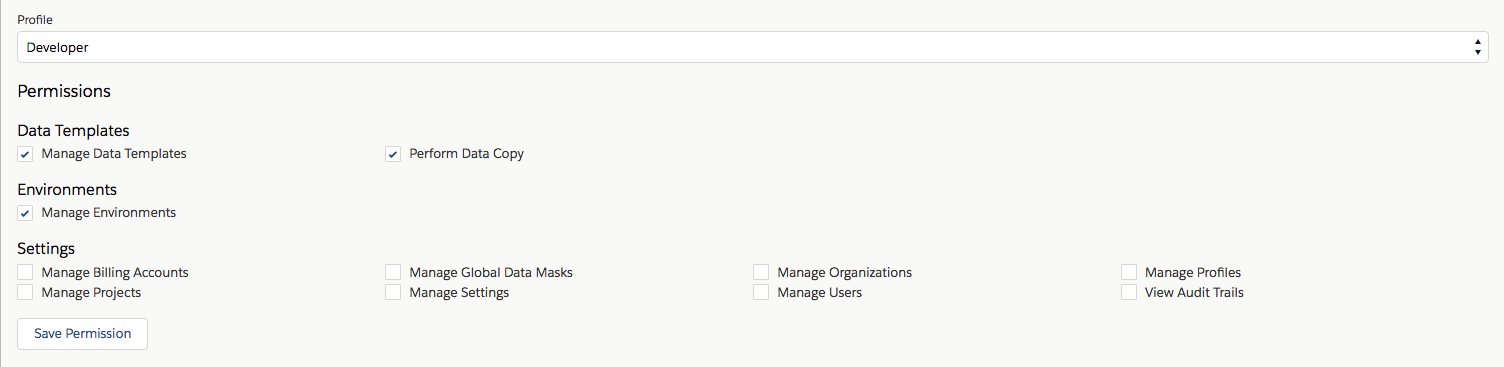
By default, OrgTools has four user profiles: Administrator, Developer, Project Manager, and Tester.
For reference, pictured below is each user profile with their default permissions. You can edit these profiles by selecting the checkbox on each permission to enable or disable. Click Save Permission to save your changes.
Description of each permission
Data Backups
Manage Data Backups
- Allow user to create, edit, and delete data backup jobs in the organization. This includes the Subject Access Request.
View Data Backups
- Allow user to view the data backup dashboards. The dashboard includes Backup History, Backup Duration, and Data Protected charts along with a table displaying the created, updated, and delete records inside each backup run.
Data Templates
Manage Data Templates
- Allow user to create, delete, and update data templates in the organization.
Perform Data Copy
- Allow user to perform a data copy on the data templates by clicking Start Data Copy in the row actions. Users cannot view the details window of the data copy that is accessed using Show Details in the row actions.
Environments
Manage Environments
- Allow user to create, delete, and update environments in the Environment Hub. Note: if a user deletes an environment, any data templates associated with that environment will no longer be associated. A new environment would manually have be added to the data template in its place.
Settings
Manage Billing Accounts
- Allow user to add and remove billing account to and from the organization.
Manage Profiles
- Allow user to create, update, and delete permissions for existing user profiles. Users can also create new user profiles.
Manage Global Data Masks
- Allow user to create, edit, and delete data masks.
Manage Projects
- Allow user to create, edit, delete, and invite users to projects from outside of the organization.
Manage License
- Allow user to authenticate the license to the Production org which the license is assigned
- Allow user to manage the users associated with each license.
Manage Settings
- Allow user to manage settings under the Organization Settings. This includes the ability to configure Organization, Projects, Data Mask, Users, Profiles, Promotions, Accounts, Budgets / Alerts, and Billing Transactions.
Manage Organizations
- Allow user to edit organization details such as name, address, and phone number.
Manage Users
- Allow user to activate or deactivate other users.
Profile Permission Defaults
The default permissions for each profile are illustrated below for your reference.
Administrator
An admin is the person that provides value to the business by automating complex business processes, makes sure the system is clean and efficient.
Developer
A developer is the API integration and code expert. Typically developers create complex workflows, triggers, Apex development, complex validation rules, AppExchange and legacy platform integrations.
Project Manager
A project manager is a person with an understanding of Salesforce and its application within a business. They typically work with developers and consultants on different projects and set the expectations and delivery timeline that will meet the business requirements.

Tester
A tester defines the test data set for the developer to to develop and test against.

Creating a User Profile
Step 1. Click New Profile.
Step 2. In the New Profile window, enter a unique name and click Save.
Step 3. Under the Profile drop down, navigate to the profile you have created.
Step 4. Select the checkbox on each permission to enable or disable it for this profile.
Step 5. Click Save Permission to save your changes.
Accounts
|
PROFILE PERMISSIONS REQUIRED |
|
Manage Billing Accounts, Manage Settings |
OrgTools has 3 different types of billing accounts (license, credit card, or promo). Users can view their existing billing account and make new ones.
Adding a Billing Account
Step 1. Click Create Billing Account in the top left corner.
Step 2. Enter a name and description for the billing account
Step 3. Select the payment type from the drop-down list; credit card, promo, license.
- For credit card, input credit card information and billing address.
- For promo, enter the promo code provided by sfApex.
- For license, check the box next to the license purchased.
Step 4. Click OK to create the billing account.
License
|
PROFILE PERMISSIONS REQUIRED |
|
Manage Licenses, Manage Settings |
Users can purchase 2 types of licenses, a data copy license and a backup/restore license. Each license is an annual subscription and is tied to one production org.
This is where users can view and manage the details of their license. Users can see the type of license, expiration date, assigned production org, total users, and active users.
Authenticate Production Org
Step 1. Click the row action to the right of the license and select Authenticate Production Org
Step 2. Select either Username/Password orOAuth tab at top left of modal.
Step 3. Fill out the necessary fields and select Connect.
Billing Accounts
Click the row action button to the right of the license and select Billing Accounts to see the billing accounts and project this license is associated with.
Manage Users
Use this modal to add or remove users from a license
The left table are all the users inside the organization. The right table are the users associated with the license.
Use the left and right arrows to add or remove users from the license. Use the up and down arrows to order the associated users.
Hit Save to make the changes.
Budgets/Alerts
|
PROFILE PERMISSIONS REQUIRED |
|
Manage Billing Accounts, Manage Projects, Manage Settings |
With OrgTools, you can create a budget and track expenses. You are able to track expenses for specific projects and billing accounts. This is useful for teams, or large organizations who bill external clients, allowing the project manager to ensure operations don’t go over budget.
Creating a Budget
Step 1. Complete the following fields:
- Budget Name
- Applies To - Select whether this budget will be applied to a billing account or a project
- Billing Account or Project - Select the specific billing account or project the budget will be applied to.
- Budget Amount - Select a budget amount.
Step 2. Under Percent of Budget, set a percentage or specific amount of the budget to allocate. You are able to define as many as these tiers as you would like.
For example, you have set your budget amount is $100 and the percent of budget to 25%. OrgTools will then automatically populate $25 under amount, and vice versa.
Alerts
You can set alerts to notify billing admins when a budget goes over a specified amount. To receive budget alerts, be sure to have the Manage Projects permission marked for your profile.
Billing Transactions
|
PROFILE PERMISSIONS REQUIRED |
|
Manage Billing Accounts, Manage Settings |
Users can view all transactions and details. The table will display information for each data copy. The columns include description, payment type, transaction date, billed amount, project, billing account, and created by.
Users have the ability to filter by transactional date using the From Date and To Date fields in the top right.
Users can export their transactions to a CSV file by clicking the Export to CSV in the top right corner.
How Billing Works
You will only be charged for successful records copied and never for failed records. We put a hold of $50 on your credit card for every 50 MB of data copied. We charge your credit card once every 24 hours.
We currently support the following payment methods:
Credit Card
- American Express
- Carte Blanche
- China UnionPay
- Discover
- Elo
- JCB
- Laser
- Maestro
- MasterCard
- Solo
- Switch
- Visa
We plan to support additional payment types like debit card and PayPal in the near future.
If you have questions about billing or a particular transaction, please email accountservices@www.sfapex.com.